[ad_1]
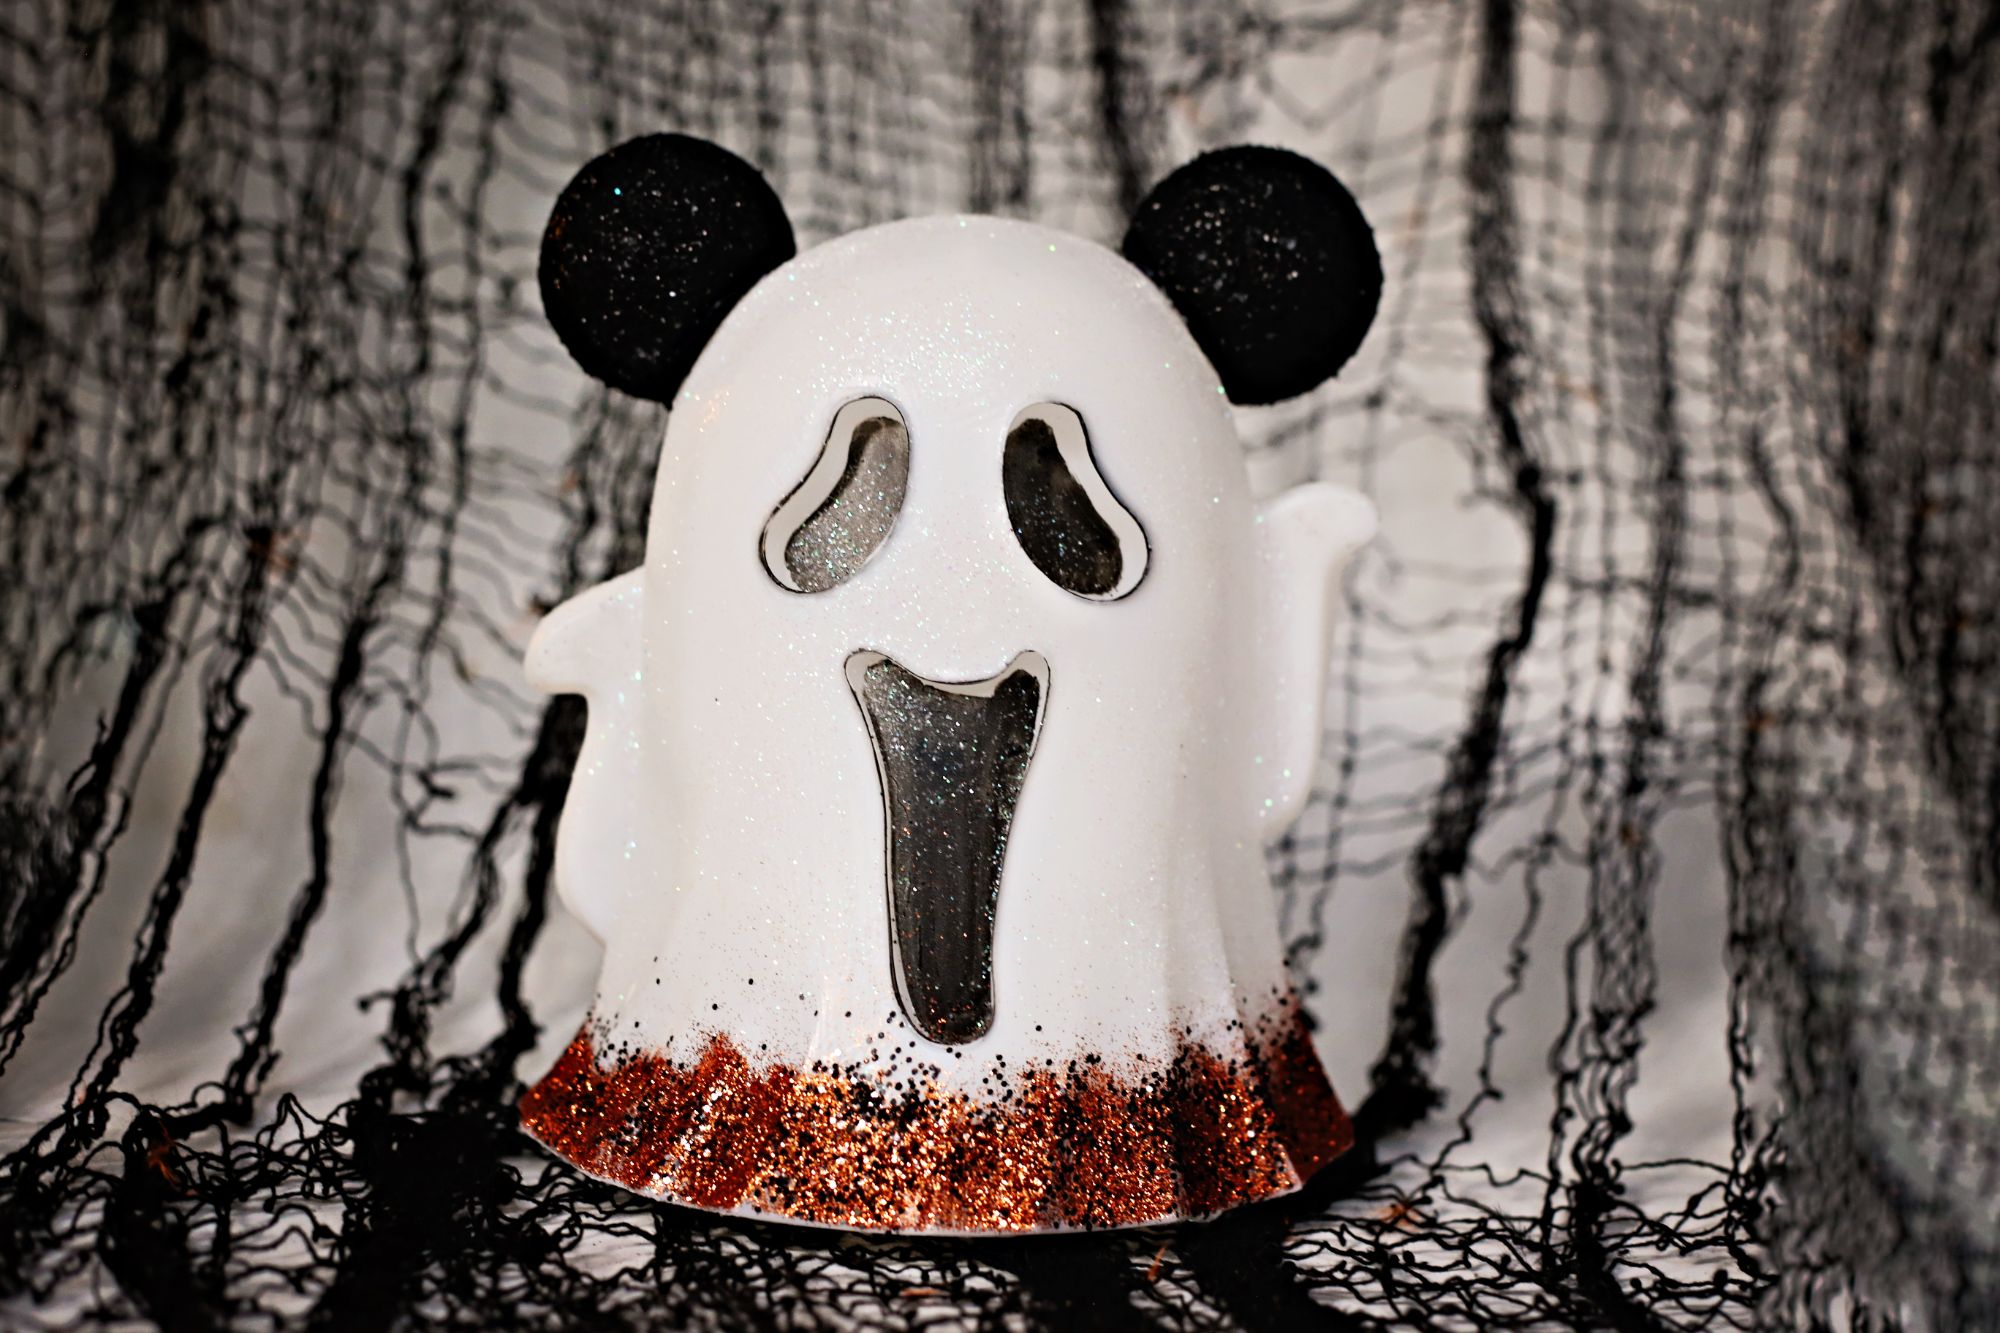
Make your own quick and easy ghost Mickey Mouse luminary to light up your Halloween decor! Just a few minutes and a couple bucks turns a Dollar Tree ghost lamp into your favorite charming Disney character.
Create more fun and spooky Halloween decor with these DIY Dollar Tree gold skeleton shelf sitters, plus our Halloween meets Dia de los Muertos Dollar Tree mantel decor and our favorite creepy vintage Halloween free printables.

Spooky Disney Halloween: DIY Mickey Mouse Ghost Luminary
Halloween is just around the corner, and it’s time to get your creative juices flowing for some spooktacular decorations. If you’re a Disney fan and love crafting, we have the perfect project for you: the DIY Mickey Mouse Ghost luminary.
This easy Dollar Tree craft combines the iconic Mickey Mouse silhouette with the ghostly charm of Halloween, making it a fantastic addition to your spooky decor. If you love Mickey’s Haunted Mansion, this brings a tiny piece of it home to your mantel, or use it as a night light for your kids room.
In this blog post, we’ll guide you through the step-by-step process of creating this bewitching masterpiece in just a few minutes! But that’s not all; we’ll also explore why this craft is perfect for Halloween, offer some creative variations, answer common questions, and provide helpful tips for making your own Disney Halloween magic.

This post contains affiliate links. Learn more and read our full disclosure policy here.
Why This is a Great Halloween Craft
The Magic of Disney Halloween: The DIY Mickey Mouse Ghost brings together the beloved Disney character, Mickey Mouse, with the eerie spirit of Halloween and The Haunted Mansion. This unique blend of cuteness and spookiness creates a perfect balance for your Halloween decorations. It’s an excellent way to showcase your love for Disney while embracing the spirit of the season. No ghost exterminators needed here!
disney halloween
Plan Your Next Visit
We love visiting Disneyland in October! Magical Halloween events plus perfect temps. Get the best ticket prices + more with our partners at Get Away Today.
Budget-Friendly: Halloween decorations can quickly add up, but this craft is not only fun but also incredibly budget-friendly. All the supplies you need can be found at your local Dollar Tree, making it an affordable project that anyone can enjoy. Save money on your decor, and put the rest of your money towards your Disney tickets 😉
How to Make A Ghost Mickey Mouse: Step-by-Step Tutorial

Mickey Mouse Ghost Supplies
- Dollar Tree ghost lamp luminary
- Glitter (White, black, and your color choice – I used orange and purple)
- Black Paint
- Mod Podge
- Black Paint Pen
- Two 2-inch Styrofoam Balls
- Hot Glue Gun
- Paint Brush
This cute Mickey Mouse ghost luminary is SO easy because you just add Mickey ears and a bit of glam to a premade ghost lamp. If you can’t find one at your local Dollar Tree, here are some other good options we found for lamps, luminaries, and other ghosts that are ready for Mickey ears! Look for a ghost figure with a rounded head to match the iconic Mickey mouse silhouette.
Step by Step DIY Ghost Mickey Mouse
Before you start: Be prepared for a little mess; it’s all part of the fun. Cover your workspace with newspapers for easy cleanup.
Step 1: Prep foam balls
Begin by carving off about a quarter inch from both Styrofoam balls on one side. This will create a flat surface to attach the balls to the ghost’s head.

Paint the Styrofoam balls with black paint and allow ample time for them to dry. Apply several coats of black paint to the Styrofoam balls to ensure the creases are well-covered.

Step 2: Paint ghost eyes and mouth
Use the black paint pen to fill in the inside of the mouth and eyes on the ghost lamp. Once again, let it dry completely.

Step 3: Add white glitter
Now, it’s time to add some shimmer. Paint the top of the ghost with Mod Podge. However, refrain from painting the bottom inch of the ghost for now.

Sprinkle white glitter generously on the ghost’s top.

Step 3: Add black or color glitter
Proceed to paint the bottom inch of the ghost with Mod Podge and sprinkle black glitter over it.

For an extra pop of color, add some orange or purple glitter to the mix.

For added Disney magic, use the same process to apply black glitter to the painted foam balls.

Step 4: Attach Mickey ears
Finally, use your trusty hot glue gun to attach the dried Styrofoam balls to the ghost, forming Mickey’s iconic ears.

This DIY Mickey Mouse Ghost is a fantastic Dollar Tree Halloween craft that allows you to infuse the magic of Disney into your spooky season decor. With its budget-friendly supplies, creative potential, and the flexibility to customize it according to your theme, this craft is sure to delight both Disney enthusiasts and Halloween aficionados. So, gather your supplies, follow our step-by-step tutorial, and create a Halloween masterpiece that combines the charm of Mickey Mouse with the haunting allure of the season. Happy crafting! 🎃👻✨
Variations for the Craft
- Glow-in-the-Dark Mickey Ghost: Instead of using colored glitter, you can opt for glow-in-the-dark glitter to make your Mickey Mouse Ghost truly come to life at night with an ethereal glow.
- Mini Mickey Mouse Ghosts: Scale down the size and make several smaller Mickey Ghosts to create a spooky Mickey Mouse army to decorate your Halloween party. No lonesome ghosts here!
- Custom Colors: Don’t limit yourself to just white, black, and one additional color. Get creative with your glitter choices and create Mickey Ghosts in a variety of colors that match your Halloween decor.
Get in the Halloween spirit with some of our favorite movies
Watch all of these and more on Disney+
Common Questions About the DIY Mickey Mouse Ghost
Can I use different types of glitter?
Absolutely! You can experiment with various colors and types of glitter to match your Halloween theme.
How do I use glitter without making a huge mess?
If you hate the mess of glitter but love the added glitz for crafts, use glitter glue, glitter markers, or glitter paint instead. Seal with a clear acrylic sealer to ensure that the glitter stays on your craft and not all over your house.
Can I use a different base instead of the Dollar Tree Ghost?
While the Dollar Tree ghost is a convenient option, you can adapt this craft to different ghost decorations as long as they have a similar shape. That could be any ghost decor, or even a white paper lantern! Here are some of our picks:
How long does it take for the Mod Podge to dry?
Mod Podge typically dries within 15-20 minutes, but the exact drying time can vary based on the thickness of the application and environmental conditions.
More Dollar Tree Halloween
- Dollar Tree ghost lamp luminary
- Glitter White, black, and your color choice – I used orange and purple
- Black Paint
- Mod Podge
- Black Paint Pen
- Two 2-inch Styrofoam Balls
- Hot Glue Gun
- Paint Brush
-
Begin by carving off a quarter inch from both Styrofoam balls. This will create a flat surface to attach the balls to the ghost’s head.
-
Paint the Styrofoam balls with black paint and allow ample time for them to dry. Apply several coats of black paint to the Styrofoam balls to ensure the creases are well-covered.
-
Use the black paint pen to fill in the inside of the mouth and eyes. Once again, let it dry completely.
-
Now, it’s time to add some shimmer. Paint the top of the ghost with Mod Podge. However, refrain from painting the bottom inch of the ghost for now.
-
Sprinkle white glitter generously on the ghost’s top.
-
Proceed to paint the bottom inch of the ghost with Mod Podge and sprinkle black glitter over it.
-
For an extra pop of color, add some orange or purple glitter to the mix.
-
For added Disney magic, use the same process to apply black glitter to the painted foam balls.
-
Finally, use your trusty hot glue gun to attach the dried Styrofoam balls to the ghost, forming Mickey’s iconic ears.
Tips:
Be prepared for a little mess; it’s all part of the fun. Cover your workspace with newspapers for easy cleanup.
Variations for the Craft
Glow-in-the-Dark Mickey Ghost: Instead of using colored glitter, you can opt for glow-in-the-dark glitter to make your Mickey Mouse Ghost truly come to life at night with an ethereal glow.
Mini Mickey Mouse Ghosts: Scale down the size and make several smaller Mickey Ghosts to create a spooky Mickey Mouse army to decorate your Halloween party.
Custom Colors: Don’t limit yourself to just white, black, and one additional color. Get creative with your glitter choices and create Mickey Ghosts in a variety of colors that match your Halloween decor.
Pin this to save and share!

Cassity Kmetzsch started Remodelaholic after graduating from Utah State University with a degree in Interior Design. Remodelaholic is the place to share her love for knocking out walls, and building everything back up again to not only add function but beauty to her home. Together with her husband Justin, they have remodeled 6 homes and are working on a seventh. She is a mother of four amazing girls. Making a house a home is her favorite hobby.
Related
[ad_2]
Source link


